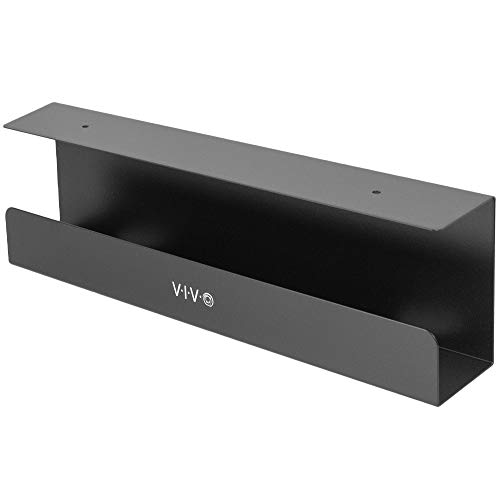
Complete Guide to Desk Cable Trays
Say goodbye to tangled wires and messy desk surfaces. Discover how the right cable tray transforms your workspace – from under-desk clutter to a clean, organized, and productive setup.
Shop Top Cable TraysWhat is a desk cable tray? A cable tray is a mounting accessory that attaches under your desk to hold power strips, adapters, and excess cables. It lifts wires off the floor, keeps them neatly routed, and frees up valuable surface space. Whether you have a standing desk or a fixed workstation, a quality cable tray is the foundation of an organized workspace.
Why Your Desk Needs a Cable Tray
📦 Surface Clutter Elimination
Power strips, chargers, and cable loops consume up to 20% of your usable desk space. A cable tray moves these items under the desk, giving you a clear, uncluttered work surface for monitors, keyboard, mouse, and documents.
- More usable workspace for productivity
- Less visual distraction while focusing
- Easier cleaning and dusting of your desk
🛡️ Protection & Longevity
Unmanaged cables are prone to damage from chair wheels, foot traffic, and accidental tugs. A cable tray shields your wires from physical strain, prevents fraying, and extends the life of your electronics.
- Prevents cable damage and signal issues
- Protects against accidental disconnections
- Reduces fire hazards from pinched cords
🧼 Easy Maintenance & Flexibility
Changing your setup? With a cable tray, you can quickly route new cables or swap devices without crawling under the desk to untangle knots. It simplifies both daily cleaning and major reconfigurations.
- Quick access to power strips and adapters
- Simplifies desk reconfiguration
- Makes under-desk cleaning effortless
🪑 Aesthetic & Professional Look
Whether you're working from home or in a corporate office, clean cable management projects professionalism. A tidy under-desk area also makes video calls look better – no more messy wires in the background.
- Enhances the visual appeal of your workspace
- Impresses clients and colleagues during video calls
- Creates a calm, focused work environment
Types of Cable Trays for Desks
Open Channel Trays
Simple U-shaped metal or plastic trays. Best for bundling multiple cables along a single route under the desk. Easy to add or remove cables.
Enclosed Cable Cages
Mesh or perforated baskets that hold power strips and bulky adapters. Great for large plugs and transformers that don't fit in slim trays.
Modular / Expandable Systems
Segmented trays that can be extended or combined. Perfect for large desks or setups with many devices that grow over time.
Stick-On / Adhesive Trays
Lightweight trays that attach with strong 3M tape. No drilling required – ideal for rental spaces or glass desks where screws aren't an option.
Screw-Mount Steel Trays
Heavy-duty steel trays bolted to the desk frame. Maximum stability and weight capacity – perfect for standing desks and heavy power strips.
Under-Desk Tray Kits
Complete kits with trays, cable clips, zip ties, and adhesive pads. All-in-one solution for beginners who want everything in one box.
Cable Tray Comparison: Which One is Right for You?
| Feature | Open Channel | Enclosed Cage | Stick-On | Screw-Mount Steel |
|---|---|---|---|---|
| Best For | Multiple thin cables | Power strips & adapters | Rental / glass desks | Heavy-duty setups |
| Installation | Screw or adhesive | Screw mount | Adhesive only | Screw mount |
| Weight Capacity | 5–15 lbs | 10–25 lbs | 2–5 lbs | 25–50 lbs |
| Price Range | $12–$30 | $20–$45 | $10–$25 | $25–$60 |
| Ease of Cable Access | High | Medium | High | Medium |
How to Choose the Right Cable Tray
📏 Measure Your Desk
Measure the under-desk area where you'll mount the tray. Consider the depth (front to back) and width available. For corner desks, ensure the tray doesn't interfere with legroom or the desk frame's support beams.
- Minimum clearance: 4–6 inches from the back edge
- Allow space for cable bends and plugs
- Check for obstructions like support bars
🔌 Count Your Devices
List all the devices you'll connect: monitors, computer, speakers, chargers, USB hubs, and more. Count the number of cables and the size of power adapters. This determines the tray length and depth you need.
- For 5–8 cables: 15–20 inch tray
- For 8–15 cables: 24–30 inch tray
- Large adapters need 3+ inch depth
⚖️ Weight & Material
Steel trays are stronger but heavier. Aluminum is lightweight and rust-resistant. Plastic trays are affordable but less durable. For standing desks that move up and down, choose a lightweight aluminum or steel tray that won't add excessive strain on the motor.
- Steel: best for heavy power strips
- Aluminum: good balance of weight & strength
- Plastic: budget-friendly, lighter loads
🛠️ Installation Method
If you can drill into your desk, screw-mount trays offer the most stability. For glass desks or rental furniture, adhesive or clamp-on trays are safer choices. Also consider under-desk cable management systems that combine trays with raceways for a complete solution.
- Screw mount: permanent, strongest hold
- Adhesive mount: no-drill, lighter capacity
- Clamp-on: adjustable, no permanent marks
Step-by-Step Cable Tray Installation
📋 Installation Checklist
- Turn off and unplug all devices before starting
- Mark mounting holes with a pencil or tape
- Pre-drill holes for screw mounts (if needed)
- Mount the tray securely to the desk underside
- Place power strip and adapters inside the tray
- Route cables from devices into the tray
- Use zip ties or Velcro straps to bundle cables
- Test that all cables reach their devices comfortably
- Plug everything back in and test functionality
- Adjust cable routing for a neat appearance
Common Cable Tray Mistakes to Avoid
⚠️ Overloading the Tray
Exceeding the tray's weight capacity can cause it to sag or detach. This is especially risky for standing desks where vibration from movement can loosen mounts over time.
- Always check the manufacturer's weight limit
- Distribute weight evenly across the tray
- Consider a wider tray if you have many devices
📐 Incorrect Tray Position
Placing the tray too close to the front edge can restrict legroom, while placing it too far back makes cable routing difficult. Ideally, the tray should be 2–4 inches from the back edge of the desk.
- Keep tray away from knees and chair arms
- Align with your monitor cable locations
- Test with your chair fully pushed in
🔌 Ignoring Cable Length
If your cables are too short to reach the tray, you'll have tension and strain on the ports. Use extension cables or USB hubs to extend reach without risking port damage.
- Measure cable lengths before installing
- Consider cable extenders for monitors
- Avoid stretching cables across the tray
🔄 Forgetting Future Upgrades
If you plan to add more devices later, choose a tray with extra capacity. Modular trays are ideal because you can extend them as your setup grows.
- Buy a tray one size larger than you need
- Look for trays with removable dividers
- Plan for at least 2 spare cable slots
Integrating Cable Trays with Other Solutions
A cable tray works best as part of a complete under-desk cable management strategy. Combine it with cable raceways for vertical cable runs, cable sleeves for bundling visible wires, and desk grommets to route cables through the desk surface. Together, these tools create a completely clutter-free workspace.
🛒 Ready to Clear Your Desk Clutter?
Browse our recommended cable trays and cable management accessories to build the organized workspace you deserve. Each product is selected for quality, durability, and ease of installation.
View Recommended Cable Trays ↓